DRAWING DIMENSIONING
To assign dimensions to a design, there are different "dimension style" to use, based on what we want to be quoted.
We also need to set at least one "dimension style" to define the visualization and measurement of dimensions inserted into the drawing.
These features may vary depending on the scale factor with which to print the drawing, so as to be sized correctly, or even according to the units we want to represent, e.g. centimeters or millimeters.
Let's take a practical example to understand better:
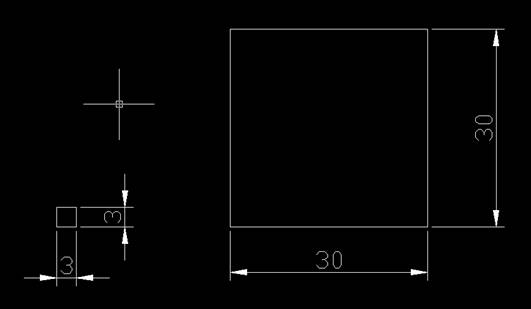
We see listed in the following two squares, the first of 3x3 units, the second of 30x30 units.
If you print them together on a scale of 1:1 will cause the former is 3 mm x 3 mm and the second 30mm x 30mm.
The size of the text and arrows of the dimensions may be fine as is.
We see listed in the following two squares, the first of 3x3 units, the second of 30x30 units.
If you print them together on a scale of 1:1 will cause the former is 3 mm x 3 mm and the second 30mm x 30mm.
The size of the text and arrows of the dimensions may be fine as is.
Now consider the same design, as if the units were centimeters ....
If print it still in 1:1 scale, we might indicate (e.g. by writing on a corner) that the design is in 1:10 scale, but about the dimension style, we will leave them like that but considering them in cm.
We then printed two designs the same, but the second whit indicated "1:10 scale", represents a square of a 3cm x 3cm and a second of 30cm x 30cm
However, if we want to print the second design, with the dimensions representing the mm, we have to set the "dimension style" to consider the size of a unit 10 times, indicating the first and second square respectively 30x30 and 300x300.
If we really wanted to print it on a scale of 1:1 (ie the truth or full scale) will set up a print scale to 10:1.
The design is then printed ten times bigger and with it the appearance of the shares will be ten times greater.
To bring aspect back to starting, we should go into settings and reduce the dimension style settings that affect the appearance of units, size of the text, and arrows.
The design is then printed ten times bigger and with it the appearance of the shares will be ten times greater.
To bring aspect back to starting, we should go into settings and reduce the dimension style settings that affect the appearance of units, size of the text, and arrows.
We can also consider the second square as enlarged detail of the first.
In this case the dimensions given should be equal in respect of the same object represented with two different scale factors.
To do this we have two ways:
In this case the dimensions given should be equal in respect of the same object represented with two different scale factors.
To do this we have two ways:
- Manually change the dimensions of the enlarged detail, after they've been created.
- Create a second "dimension style" where to set the scaling factor smaller (in
this case 0.1) and applies only to the dimensions of the enlarged detail.
We shall see shortly how to do this.
this case 0.1) and applies only to the dimensions of the enlarged detail.
We shall see shortly how to do this.
“Dimension Toolbar”
To draw dimensions on the design we'll use the "dimension toolbar" on which commands are needed.

We will consider the following basic commands for the creation of the dimensions:
 Linear
  Aligned
  Radius
  Diameter
  Angular
  Dimension style


0 comments:
Post a Comment